BeHome247’s bulk messaging feature makes it simple to set up automated messages for your guests. Follow the steps below to get started.
1. Navigate to the Message Center feature and select New Message.
 2. Type in a Reference Name that clearly identifies the purpose of your message.

Note: The reference name you select is for internal use only.
3. Select the communication tool you'd like to use:
- Email: This option provides a large variety of customization. You can build out your email using most features you would have in Outlook/Gmail. Make sure to include a subject if you use this tool. The email will go through to the email address on file.
- SMS: This will go to the guest’s cell phone if we have this on file. We suggest condensing your message when using the text message feature.

Tip: If you're interested in using both tools, mark the checkbox next to both options.
4. Add the content of your message and click on Next.
 5. In the Target tab, set your Target Audience by selecting Guests in the Send message to section.


6. Click on Define Filter Rule and consider the following suggestions to set your target audience:
- Date Range – Use this option if there is an event happening in the future that you need to notify guests about.
- Groups – This could be property or feature specific (e.g., units, gate codes, pools, golf carts, etc.).
- Marketing Source Code – If the reservation pulls from Airbnb, you can send a message inviting them to book direct.
Example: Community pool repair — The target audience would be filtered by:
- The dates the pool would be out of commission (Check-in from 8/31/2020- 9/5/2020)
- Group: The property
 7. Click on Schedule to set up the message deployment and select Enable Triggers. The following trigger options are available:
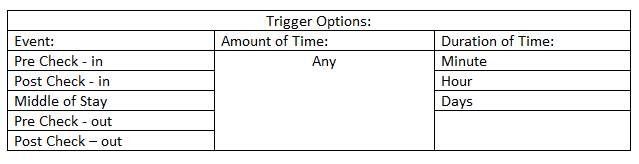
9. Select the triggers that best fit your needs (e.g., Pre Check-in, 7 days)
 10. Once you have your trigger set, click Save.
Note: If you want to send a message on demand, do not fill out the Schedule tab. This action will create a toggle for you to hit Send once the message is activated.
11. After clicking Save, you'll be sent back to the Message Center. Click Activate once you are ready for your new message to start deploying.

Note: You can also easily set up messaging for owners using the process above.